We Built the Lovable for AI Agents - Here’s How

We built the Lovable for AI Agents because building AI agents is a pain. There are a ton of tools in the market that make it super easy to prototype apps and websites with simple prompts, but when it comes to AI agents? You’re on your own. You need to figure out which framework to use, what tools you need, how to handle authentication for those tools, which model to pick, and how to orchestrate everything. It’s a lot.
Building a useful AI agent shouldn’t take days of wiring OAuth flows and picking frameworks. With this project that we built, you can skip doing all of that work and get a ready-to-use AI agent in under ten minutes.
A big part of what made this possible is Composio. It provides managed tools for your AI agents, handling execution and authentication, so you can get going faster. Composio has over 500 apps, each with a bunch of actions which are essentially API calls you can make for the given app. By the end of this tutorial, you will have an agent builder that can spin up live agents for all of your use cases.
Let’s walk you through how to create the AI agent builder now. Here’s the link to the GitHub project so you can follow along: https://github.com/ComposioHQ/lovable-for-ai-agents
High-Level Flow
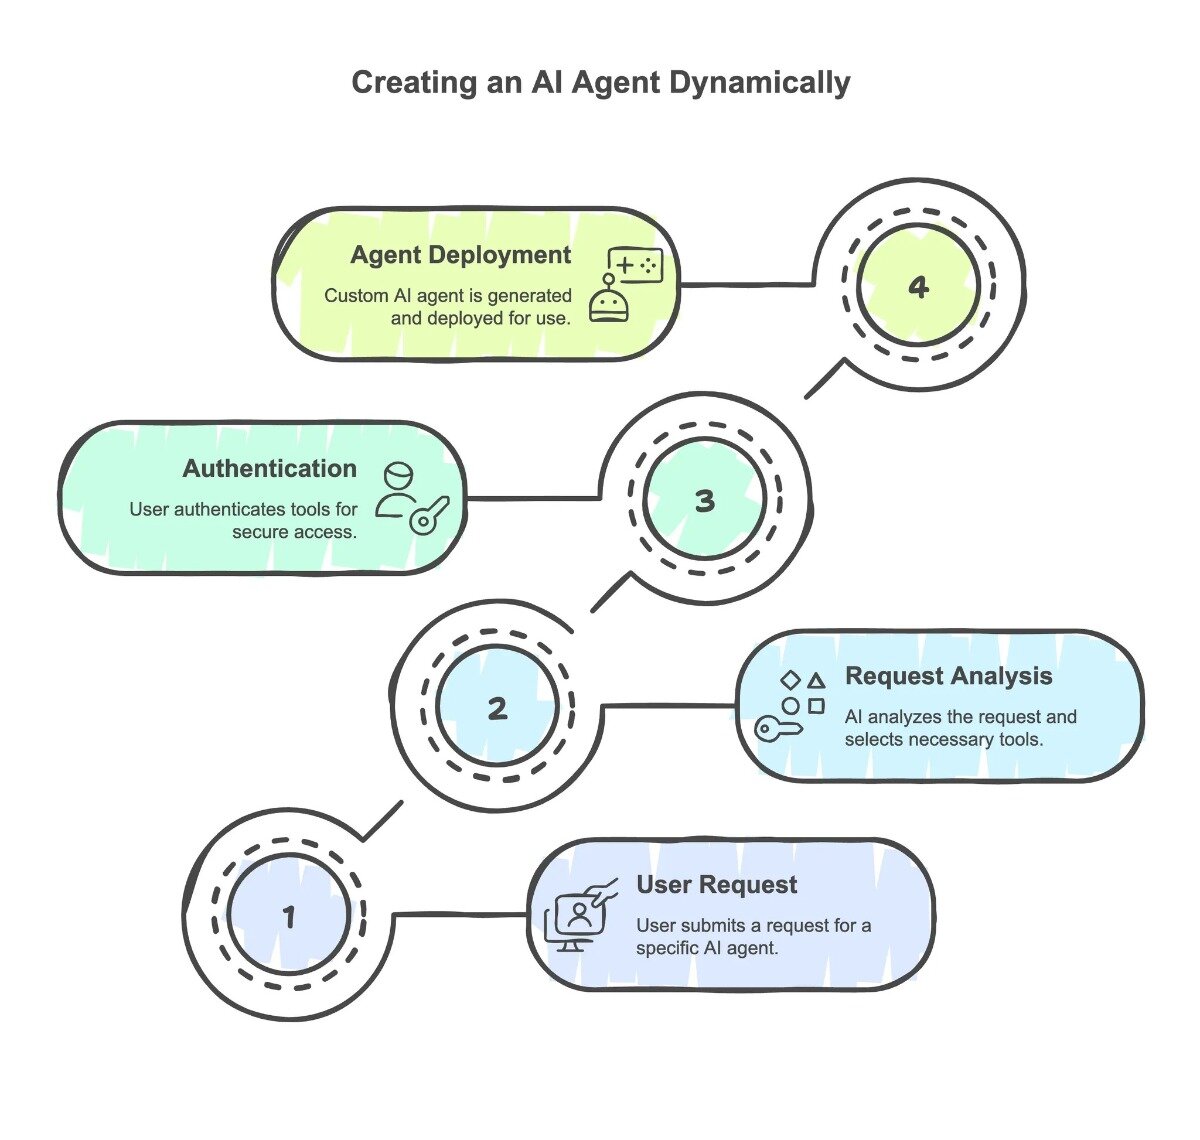
Step 1: User Request Processing When a user arrives on the platform, they submit their request for an AI agent with specific capabilities. For example, a user might request an agent that can “summarize emails from the past 10 days and save the summary to a Notion file.”
Step 2: Request Analysis and Tool Selection The user’s query is routed to an AI agent that parses the request and generates a detailed use case description. This description is then passed to the Composio Search Tools system, which identifies and returns the exact set of tools required to execute the task. In this example, the system would return: “Gmail Fetch Emails” and “Notion Create Page”.
Step 3: Authentication and Authorization Before the agent can access the required tools, we handle the authentication process for each toolkit. Different toolkits have distinct authentication flows that users must complete to grant access to their accounts. Each toolkit includes its own authentication configuration (auth config), which manages the secure connection between the user’s accounts and our platform. This ensures agents have the necessary permissions to perform actions on behalf of users.
Step 4: Dynamic Agent Generation and Deployment Once authentication is complete, the platform dynamically generates a customized AI agent tailored to the user’s specific use case. This includes:
- A custom frontend interface
- A unique system prompt optimized for the task
- Integration with the authenticated tools
- Immediate deployment on the right side of the screen, ready for use
User Interface
You can access this application through a frontend that you deploy locally (instructions in the repository’s README) and the server endpoints are available in the Appendix section towards the end if you’re interested in peeking behind the curtain.
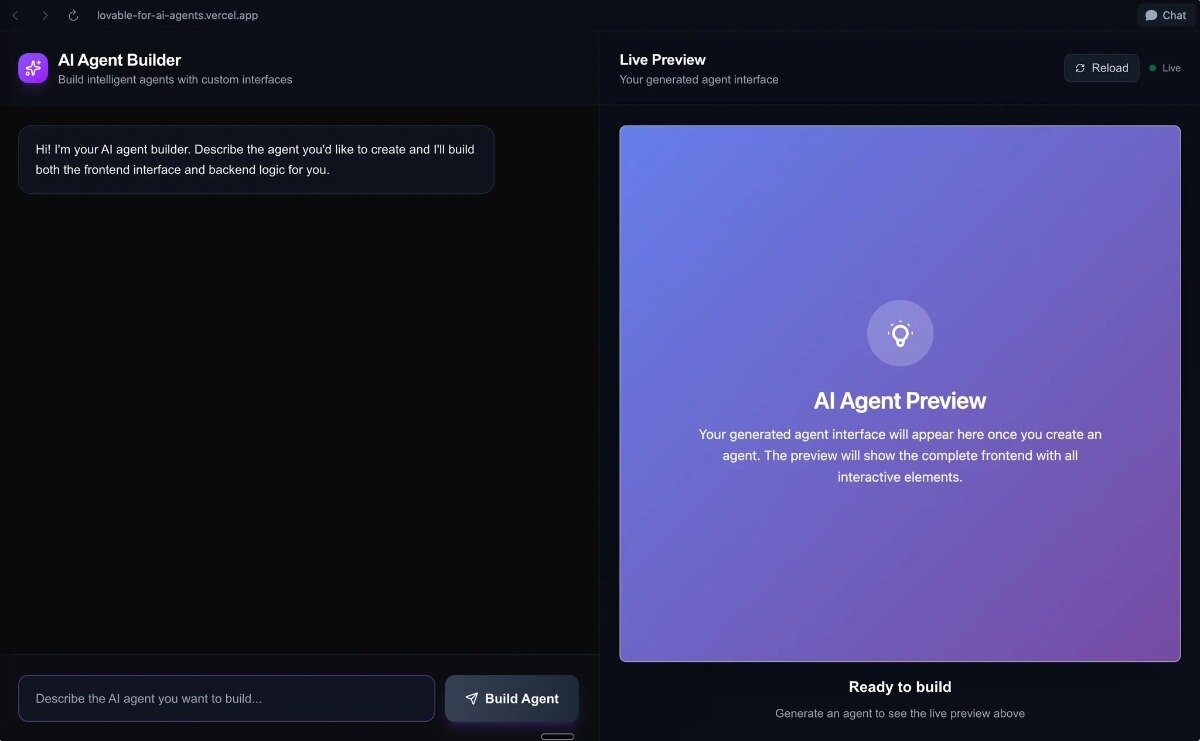
A screenshot of the Builder Agent dashboard.
The frontend is a component whose primary responsibilities are:
- Chat Interface: Managing the conversation between the user and the AI agent builder.
- Agent Generation: Sending the user’s ideas to the backend and handling the generated code.
- Connection Management: Guiding the user through connecting the necessary toolkits
- Live Preview: Displaying the generated agent’s frontend in an interactive iframe.
Code
The code for the platform is available on Composio’s GitHub at https://github.com/ComposioHQ/lovable-for-ai-agents.
The following sections will dive deeper into how this code works.
Building Agents On The Fly
Instead of building one big AI that tries to do everything (which never works well), we built a system that creates specialized agents on demand. Each agent is an expert at one thing, and we generate them dynamically based on what you need.
There’s an /api/generate-agent endpoint which you can call to make this happen. You give it a simple idea for an agent, and it orchestrates this whole process to create a fully functional AI agent with its own frontend and backend.
How We Build an Agent From Scratch
Here’s the step-by-step breakdown:
- Figure Out the Use Case: We take your agent idea and use an LLM to boil it down to a specific use case. This helps focus the agent on exactly what it needs to do.
// Step 1: Generate use case from agent idea
const useCasePrompt = `
Based on this agent idea: "${agentIdea}"

Generate a concise, specific use case description that captures the core functionality and required actions.
Focus on what the agent needs to DO, not what it is. Use action verbs and be specific about the domain.
...
`;

const useCaseResult = await generateText({
  model: openai('gpt-4.1'),
  prompt: useCasePrompt,
  maxTokens: 100,
});

const useCase = useCaseResult.text.trim();
- Find the Right Tools: Once we know what the agent needs to do, we use Composio’s
COMPOSIO_SEARCH_TOOLto find the perfect tools for the job.
// Step 2: Discover required tools using COMPOSIO_SEARCH_TOOLS
let discoveredTools: string[] = ['COMPOSIO']; // Default fallback tools

try {
  // Get the search tools first
  const searchTools = await composio.tools.get('default', {
    tools: ['COMPOSIO_SEARCH_TOOLS']
  });

  // Use AI to determine likely tools based on use case
  const toolSelectionPrompt = `
  Based on this use case: "${useCase}"

  Use only the search tools to find the most relevant tools for the use case and return the tool names.
  ...
  `;

  const toolSelectionResult = await generateText({
    model: openai('gpt-4.1'),
    prompt: toolSelectionPrompt,
    tools: searchTools,
    maxSteps: 5,
  });

  const suggestedTools = toolSelectionResult.text
    .split(',')
    .map(tool => tool.trim())
    .filter(tool => tool.length > 0);

  discoveredTools = [...new Set([...suggestedTools])];
} catch (error) {
  console.warn('Tool discovery failed, using defaults:', error);
}
- Create the Agent’s Brain: We generate a system prompt that defines the agent’s personality, what it can do, and its limitations. Think of it as the agent’s constitution.
-
Generate the Code: This is the really cool part. We generate both:
- Frontend: A complete HTML page with a slick chat interface, all in one file with inline CSS and JavaScript. It’s self-contained and ready to deploy anywhere.
- Backend: A Next.js API route that serves as the agent’s brain. This handles all the heavy lifting - talking to the LLM, using the Composio tools, the works.
The Hard Parts (And How We Solved Them)
Building something this dynamic came with its share of challenges. Here’s what we ran into and how we handled it:
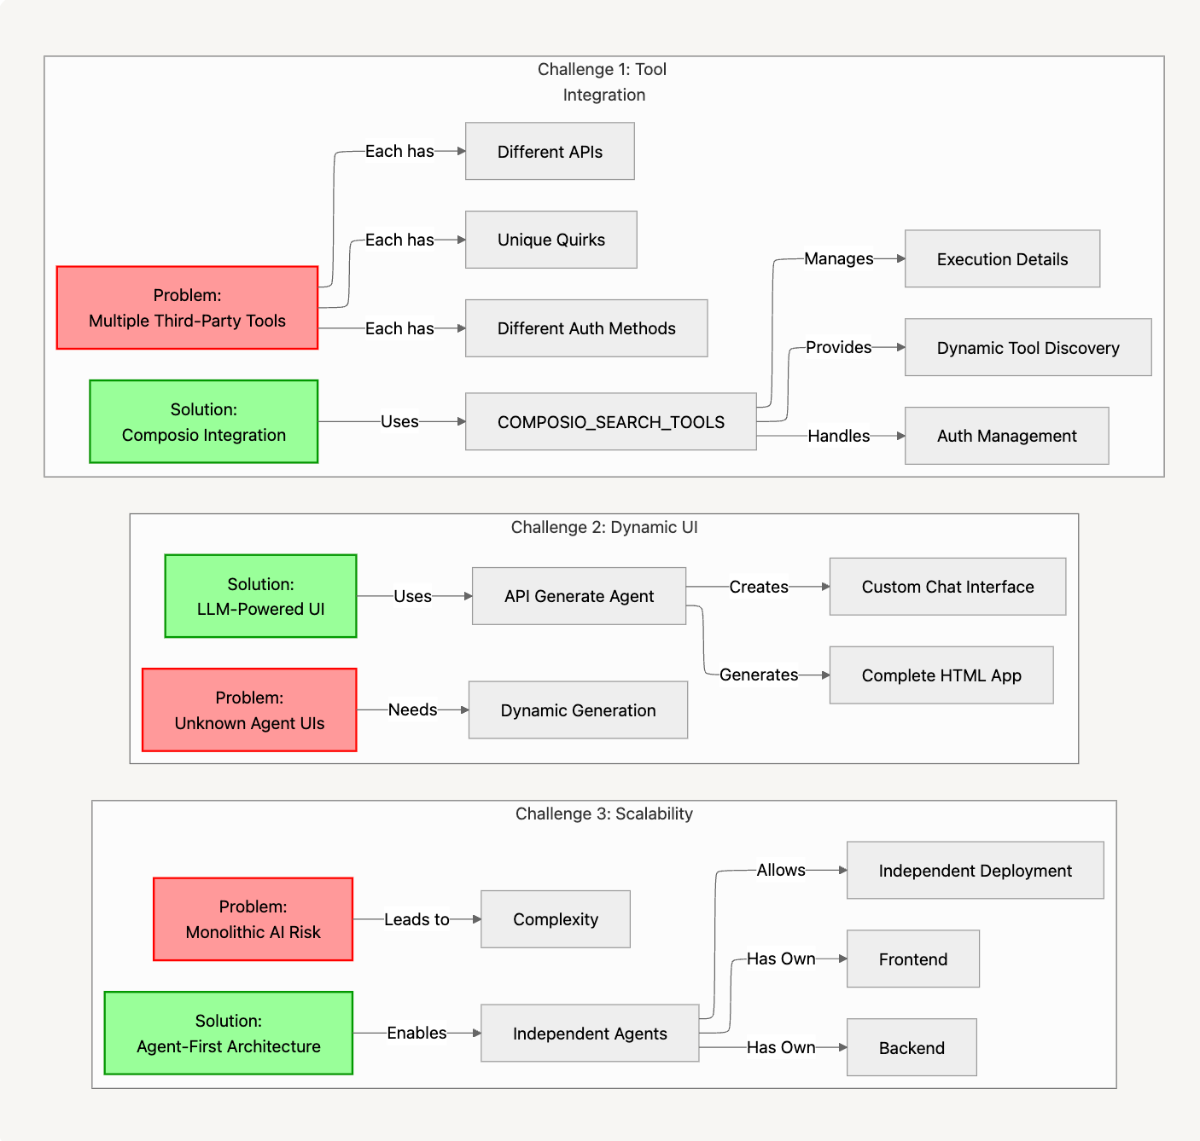
1. Dealing with a Million Different Tools
The Problem: Every third-party tool has its own API, its own auth method, its own quirks. Integrating with all of them would be a nightmare.
The Solution: Instead of building integrations ourselves, we use Composio’s COMPOSIO_SEARCH_TOOLS which abstracts away the need to mess with complicated OAuth logic and takes care of all the execution details for you.
2. Creating UIs for Agents That Don’t Exist Yet
The Problem: How do you build a UI for an agent when you don’t even know what it’s going to do?
The Solution: We use LLMs to generate the entire frontend on the fly. The /api/generate-agent endpoint creates a complete HTML application with a chat interface, customized for each agent. No complex templating system needed.
3. Making It Scale Without Building a Monster
The Problem: Building one AI that can do everything is hard.
The Solution: In this agent-first architecture, each agent is independent, with its own frontend and backend. This approach allows you to deploy, update, or remove individual agents without touching anything else.
Going Deeper Into How Authentication is Handled
The /api/create-connection Endpoint
The heart of our auth flow is the /api/create-connection route endpoint. This is where we figure out how to connect to different toolkits based on what kind of authentication they need. Here’s how it works.
When a request comes in from the frontend (app/page.tsx), we get these input parameters in the request body.
- composioApiKey: Read from your app’s environment variables to authenticate your application with Composio’s backend.
- toolkitSlug: Obtained from the most relevant tool for the user’s usecase
- authType: Authentication method to use (e.g., OAuth2 or API Key) for the toolkit.
- credentials (Optional): Sent from a user-filled form on the frontend to provide personal secrets required for custom authentication.
- userId: Generated and stored in the user’s browser session to securely link the final connection to that specific user.
Then we use this info to figure out the right auth flow.
Here’s what happens in app/api/create-connection/route.ts:
import { NextRequest, NextResponse } from "next/server";
import { Composio, AuthScheme } from "@composio/core";
import { VercelProvider } from "@composio/vercel";

export async function POST(req: NextRequest) {
  try {
    const { composioApiKey, toolkitSlug, authType, credentials, userId = "default" } = await req.json();

    if (!composioApiKey || !toolkitSlug || !authType) {
      return NextResponse.json({ error: 'Missing required fields' }, { status: 400 });
    }

    // Step 1: Get toolkit information to understand auth requirements
    const toolkitResponse = await fetch(`https://backend.composio.dev/api/v3/toolkits/${toolkitSlug}`, {
      method: 'GET',
      headers: {
        'x-api-key': composioApiKey,
        'Content-Type': 'application/json',
      },
    });

    if (!toolkitResponse.ok) {
      throw new Error(`Failed to get toolkit info: ${toolkitResponse.status}`);
    }

    const toolkitData = await toolkitResponse.json();
Two Ways to Authenticate: Composio-Managed vs. Your Own Credentials
We support two main authentication approaches:
- Composio-Managed Authentication: For toolkits that support it, we let Composio handle everything. This is the easy path - users don’t have to worry about OAuth2 flows or any of that complexity. You just sign in once and authorize Composio to access your apps and then Composio makes sure your agents get all the credentials they need.
- Custom Authentication: For other toolkits, you can support your own credentials - API keys, OAuth2 client IDs and secrets, just as you would when using any 3rd party service or API.
    // Handle case-insensitive auth type checking
    const managedSchemes = toolkitData.composio_managed_auth_schemes || [];
    const managedSchemesLower = managedSchemes.map((s: string) => s.toLowerCase());
    const authTypeLower = authType.toLowerCase();

    const isComposioManaged = managedSchemesLower.includes(authTypeLower) ||
                             managedSchemesLower.includes(authTypeLower.replace('_', ''));
Making the Connection
Here’s the code from the Composio SDK that implements both of these auth patterns.
For Composio-managed OAuth2, it’s straightforward. We create an auth config and initiate the connection, which gives us a redirect URL for the user to complete authorization:
      // Initialize Composio SDK
      const composio = new Composio({
        apiKey: composioApiKey,
        provider: new VercelProvider()
      });

      try {
        // Step 2: Create auth config using Composio managed auth (recommended approach)
        const authConfig = await composio.authConfigs.create(toolkitSlug.toUpperCase(), {
          name: `${toolkitData.name} OAuth Config`,
          type: "use_composio_managed_auth", // This is the key difference!
        });

        console.log('Created auth config:', authConfig);

        // Step 3: Initiate OAuth connection using SDK
        const connRequest = await composio.connectedAccounts.initiate(
          userId,
          authConfig.id
        );
For API key authentication, we use AuthScheme.APIKey to pass the credentials:
        // Use AuthScheme.APIKey() for proper API key connection
        const connRequest = await composio.connectedAccounts.initiate(userId, authConfigId, {
          config: AuthScheme.APIKey({
            api_key: credentials?.apiKey
          })
        });
Wrapping Up
As you’ve seen, creating agents this way is lightweight, fast, and quite useful because it results in self-contained apps that you can deploy anywhere and use without other apps or as standalone tools.
The whole process - from idea to working agent - takes just a few minutes. Compare that to the hours or days it would take to build this stuff manually, and you can see why we’re excited about it. Building AI agents used to be a time-consuming process involving lots of coding or dragging and dropping workflows. Now you can have a working agent in minutes. Thanks to Composio handling the tool integration, they’re reliable and can connect to pretty much any service you need.
What’s Next?
We hope you enjoyed this tutorial. Please drop us a line with questions, wins, or wild ideas — we read every message. We can’t wait to hear what you’re going to build. And please check out Composio. Happy hacking!
Appendix
Technical Architecture
The platform we have built has the following API routes that you can use to perform specific actions.
| Method | Endpoint | Description |
|---|---|---|
| POST | /api/create-connection | Create toolkit connections |
| POST | /api/generate-agent | Generate AI agents |
| GET | /api/toolkit-info | Get toolkit metadata |
| POST | /api/execute-generated-agent | Execute agent actions |
| POST | /api/wait-for-connection | Poll connection status |
Defined Frontend Functions
// app/page.tsx - Core Frontend Logic
handleGenerateAgent()     // Sends user's idea to the backend to build the agent and UI.
checkToolkitConnections() // Fetches auth details for tools required by the new agent.
connectToolkit()          // Starts the connection flow when a user clicks "Connect".
handleCredentialSubmit()  // Submits API keys or other credentials entered by the user.
waitForOAuthConnection()  // Polls the backend to check if the OAuth connection is complete.
Comments
Loading comments...